Wednesday, March 31, 2010

Creative Nanny Wednesday: Tomorrow is April Fools Day!


April Fools Joke

My 11 year old absolutely loves April Fools Day.Every year she enlists my help in figuring out something fun to do her big brother.Last year we did this "Milk Joke" and even though he didn't laugh at the time, once he got to school he did tell his friends that he thought it was pretty funny.It was easy to do and didn't take a lot of time.

We took 1 packet of clear powdered gelatin and mixed it with 2 T of water.
We let it stand for about 5 minutes.
Then we warmed 2 Cups of milk in the microwave and slowly mixed it into the gelatin mixture.
Then we took the milk out of the jug in the refrigator and poured it into a pitcher and poured the gelatin mixtureinto the jug.
It takes about 2 hours for the mixture to set.
When her brother tried to pour his milk for breakfast the next morning the milk would not come out.

You could also do this with juice by adding gelatin (Jell-O) in the color of the juice.

For younger kids you might just want to teach them about the silliness of April Fools Day with something simple like: Your shoes untied. Younger children don't always get the kind of humor that April Fools jokes require, and it's hard to make them understand that there is a difference between telling a lie and playing a joke.

If you do play an April Fools joke, please share it with us. We love to hear from you!
(Graphic from PC Hugware)

Wednesday, March 24, 2010

Afikomen Treasure Hunt


Celebrate Passover with a treasure hunt for the Afikomen.
What You Need
Matzo (Afikomen)
Paper
Markers
Instructions
Hide the Afikomen somewhere in the house.
Write out a series of clues that will lead the kids from the dining room table to the Afikomen.
Hide the clues underneath the kids' plates or glasses.
Start the hunt with a clue that you read and then let the fun begin.

If you are stumped for ideas on how to write out clues, here are a few suggestions:

Instead of saying:
Look in the Living Room, you could say "Crawl to the Living Room"
or "Walk Backwards to the Living Room"
You could also say "Take 25 steps left, and 10 steps right. or "Hop 10 times"
If the children are older you could say "Look under the b__ __. and have them try to fill in the blanks for where the clue is. You could also scramble the hints and let the children unscramble the words. For younger children you might use photos instead of written clues.
You can make your clues as simple or as complicated as you want to. The main idea is to have fun, use your imagination and creative lasting traditions and memories for your children.


Wednesday, March 17, 2010

My favorite Spring Craft

My Favorite Spring Craft by Glenda Propst

Even as a pre school teacher, I always enjoyed this simple craft activity. It never ceased to amaze me how a pair of googly eyes and a orange diamond shaped piece of felt could transform a cotton ball or a pom pom.

Here is what you need:
One of the sections from an egg carton

2 googley eyes

orange construction paper or felt cut in the shape of a diamond

2 Yellow Pom Poms or if you can find yellow cotton balls they work too.

Glue the cotton balls on top of each other and then glue them into the egg carton section

Glue on 2 googly eyes

This makes an adorable little chick, and you could also use them for table decorations or place cards.


Sunday, March 14, 2010

Please send us your pictures if you try our ideas


Here are the sock bunnies that 8 year old Reagan made with her mom.
Thanks for sharing with us Reagan!

Wednesday, March 10, 2010

Sock Bunnies

Sock Bunnies
by Nanny Gael Ann and her "Creative Assistant"

The minute I saw this idea in the March issue of Family Fun magazine I knew we would be making some for spring. However, the minute I showed the page to my charge, the plan turned into we just have to make them today! So we improvised a bit on the original directions using items we already had on hand and they came out just as cute.

Things you will need:

A child's sock or two or three. Of couse, in our house the stray socks are not the spring pastel colors you think of for spring bunnies but as you can see even a nice brown sock with cars and trucks worked. The others were hastily purchased at the local discount store for 50 cents a pair.

Dried lentils is what was called for to stuff the bean bag bunnys. We had some lentils but not enough for all three bunnies so we used lentils for one and rice for the other two bodies with some fiber-fill stuffing for the head areas. You can experiment with items you have on hand for stuffing the bunnies. Any type of small beans, popcorn (unpoped) or even sand would work.

A rubber band (one for each bunny) is what the magazine directions called for but not finding a small rubber band in the kitchen drawer we found a short piece of pipecleaner did the trick.

Ribbon (narrow worked better than wide)

scissors

Felt scraps in black, pink and white for the facial features (eyes, nose and bunny teeth). We used felt for some and craft foam for other parts. Having some wiggle eyes the right size on hand made the eyes easy.

White or colored pom-pom or cotton ball

Tacky glue was on the original list of supplies but we did not use it, because waiting for things to dry is not popular around here, instead we used mini glue dots which are so much more child friendly. I think using a hot glue gun would also get the job done nicely (adult only job).

Directions:

1. To make a sock bunny, fill a child's sock with lentils or beans or rice up to just past the heel. Close the sock with a tightly looped rubber band or a small piece of pipecleaner.

2. To create the head and neck, tie a ribbon around the sock just below the heel.

3. Use scissors to cut the sock's cuff into two ears, rounding the edges to give them the right shape.

4. Cut a nose, teeth, and eyes from felt or craft foam. Attach the facial features and a white pom-pom or cotton ball for a tail with tacky glue, hot glue (adult job only) or mini glue dots.


The End


Wednesday, March 3, 2010

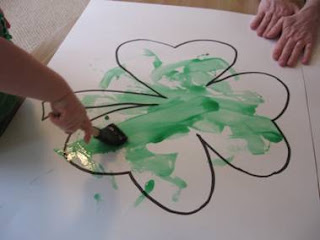
St. Patricks Day poster by Nanny Gael Ann and her creative assistant

St. Patrick's Day Shamrock Looking for a fun way to decorate for St. Patrick's Day?
Just grab your little leprechaun(s) and paint a shiny shamrock poster.


You will need:
One large poster board
Black permanent marker
Light corn syrup (1/2 to 1 cup)
Green food coloring ( a few drops)
Foam craft paint brush

1) Mix a few drops of green food coloring into the corn syrup.
2) Draw a large shamrock on the poster board. If you need a little help drawing the shamrock just think three hearts and a stem. I cut a large heart from a plain piece of 8.5 by 11 paper and then used it to trace around to form the three "leaves" of the shamrock and then added a stem.
3) Paint away little leprechauns. It dries fairly quickly but retains that wonderful shine.
Happy St. Patrick's Day from Nanny Gael Ann and her creative assistant!